Building a Scalable Student Results Management System using Vert.x and Microservices Architecture
https://github.com/MalindaGamage/Student_Result_System_Demo.git
In today's fast-paced educational landscape, managing student results efficiently is crucial for educational institutions. With the ever-increasing number of students and courses, traditional monolithic systems struggle to meet the demands of modern education. To address these challenges, we propose building a Student Results Management System (SRMS) using the Vert.x toolkit and adopting the microservices architecture.
These are some classes that I have used to develop this system.
LocalEventBusCodec class
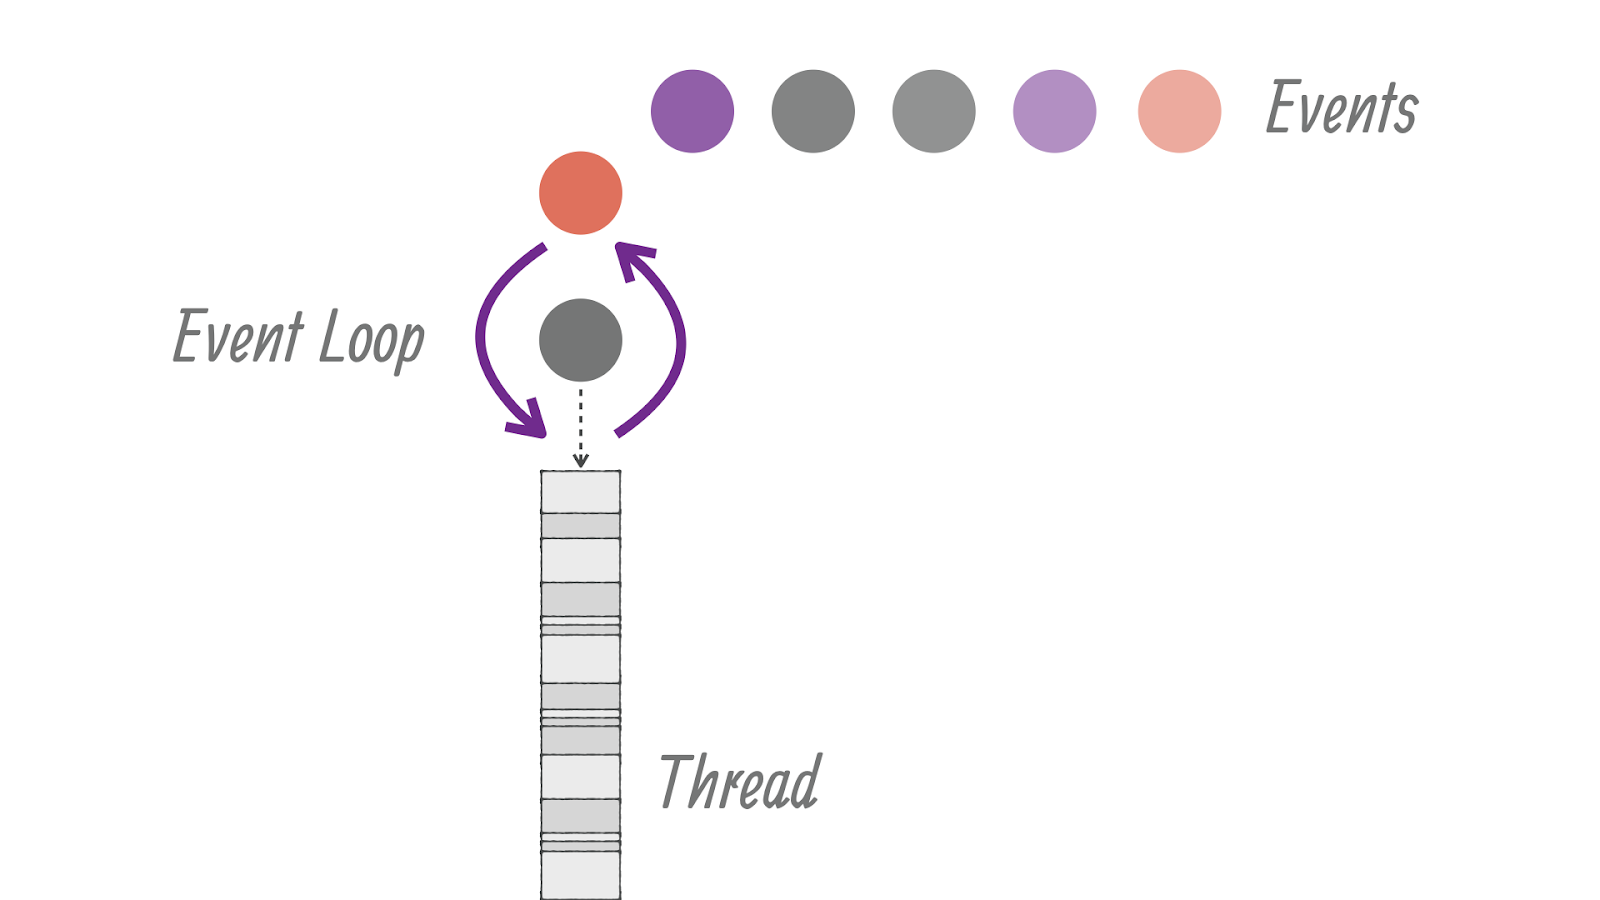
In Vert.x, the event bus is a powerful mechanism that allows different parts of the application to communicate with each other in a loosely coupled manner. It enables sending messages between different verticles (components) running in the same Vert.x instance or even across different Vert.x instances.
When messages are sent over the event bus, they need to be serialized (converted to a format that can be transmitted) before being sent and deserialized (converted back to the original format) when received by the target verticle. This serialization and deserialization process allows objects to be sent and received as messages in a language-agnostic way.
By default, Vert.x uses built-in codecs to handle basic types like strings, integers, and JSON objects. However, if you want to send custom objects or classes as messages over the event bus, you need to provide a way to serialize and deserialize them. This is where custom codecs come into play.
In the provided code, the `LocalEventBusCodec` class is a custom codec that facilitates the serialization and deserialization of `Student` and `Result` objects when they are sent over the Vert.x event bus.
Here's how the custom codec works:
1. Serialization: When you send a `Student` or `Result` object over the event bus, the custom codec is responsible for converting the object into a byte array or buffer that can be transmitted. This process is called serialization.
2. Deserialization: When the message is received by the target verticle, the custom codec takes care of converting the byte array or buffer back into the original `Student` or `Result` object. This process is called deserialization.
With this setup, you can now send instances of `Student` and `Result` objects as messages over the event bus, and they will be automatically serialized and deserialized using the custom codec, allowing seamless communication between different parts of the application. This abstraction simplifies the messaging process and enables efficient communication between verticles in a Vert.x application.
Vert.x runtime
This line creates a new instance of the Vert.x Vertx class, which represents the Vert.x runtime.
In Vert.x, the `Vertx` class is the core entry point to the Vert.x framework. It provides the runtime environment that allows you to create, deploy, and manage verticles (components) that run concurrently and communicate with each other using the event bus.
Here's an explanation of what happens when you create a `Vertx` instance:
1. **Vert.x Runtime**: The `Vertx` instance represents the Vert.x runtime environment. It manages the execution of verticles and coordinates their communication.
2. **Event Bus**: The `Vertx` instance includes an event bus that allows verticles to send and receive messages (events) to communicate with each other. The event bus is a distributed, in-memory message-passing system that enables decoupled and asynchronous communication.

3. **Thread Pool**: Behind the scenes, the `Vertx` instance manages a thread pool that is used to execute the verticles. Vert.x takes care of efficiently distributing verticles across available threads, allowing them to run concurrently and take advantage of multi-core CPUs.
4. **Deployment**: Once you have a `Vertx` instance, you can deploy verticles to it. Deploying a verticle means starting its execution and making it part of the Vert.x runtime. Vert.x takes care of managing the lifecycle of verticles, including starting, stopping, and redeploying them if needed.
HttpServerVerticle is responsible for handling HTTP requests and serving the HTTP server functionality.
DBVerticle is responsible for interacting with the database and handling database-related operations.
HttpClientVerticle is responsible for making HTTP client requests to external services or APIs.
5. **Concurrency**: Vert.x is designed to be highly concurrent and scalable. The event-driven, non-blocking nature of Vert.x allows it to handle many concurrent connections and operations efficiently without the need for traditional thread-per-connection models.
6. **Asynchronous Programming**: One of the key strengths of Vert.x is its support for asynchronous programming. This means that verticles can perform non-blocking operations and efficiently handle many requests concurrently without being blocked, leading to better performance and responsiveness.
By creating a `Vertx` instance, you obtain access to all the capabilities and features provided by the Vert.x framework. It serves as the foundation for building reactive, event-driven, and high-performance applications that can handle a large number of concurrent connections and operations effectively.
AbstractVerticle class
`AbstractVerticle` is an abstract class provided by the Vert.x framework. It serves as a base class for creating verticles in a Vert.x application. Verticles are the building blocks of a Vert.x application, and they are responsible for handling different tasks and functionalities.
By extending `AbstractVerticle`, you can create your own custom verticles with specific behaviour and functionality. To create a verticle, you need to override the `start` method, which is the entry point for the verticle's execution. In the `start` method, you define the logic and actions that the verticle should perform when it is deployed.
Verticles are lightweight and can be deployed, undeployed, and scaled independently in a Vert.x application, making it a scalable and flexible way to organize your application's functionality.
Here's a brief overview of the `AbstractVerticle` class:
Vert.x provides `AbstractVerticle` to simplify the implementation of custom verticles.
It allows you to handle the deployment, initialization, and cleanup of a verticle.
You can override the `start` and `stop` methods to define the behaviour when the verticle is deployed and undeployed, respectively.
The `start` method is executed when the verticle is deployed, and you can define the main logic or tasks that the verticle should perform here.
The `stop` method is executed when the verticle is undeployed, and you can perform any cleanup or resource release tasks here.
HttpServerVerticle class
HttpServerVerticle is responsible for handling HTTP requests in a Vert.x application. This verticle sets up an HTTP server to handle POST and GET requests related to student data. It uses the event bus to send and receive data for processing in other verticles, allowing for a decoupled and scalable architecture in a Vert.x application.
This creates an object of Router, which is used to define routes for handling HTTP requests. The router is an essential component in Vert.x that allows you to specify how different URLs should be handled by the application.
This line enables the parsing of request bodies. It adds a BodyHandler to the router, which automatically parses the request body for incoming requests, allowing easy access to the JSON or form data.
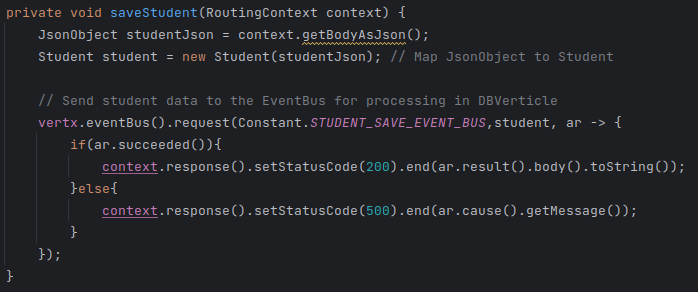
This line defines a route to handle HTTP POST requests with the path "/students". It specifies the method saveStudent to be executed when an HTTP POST request is received on this route.
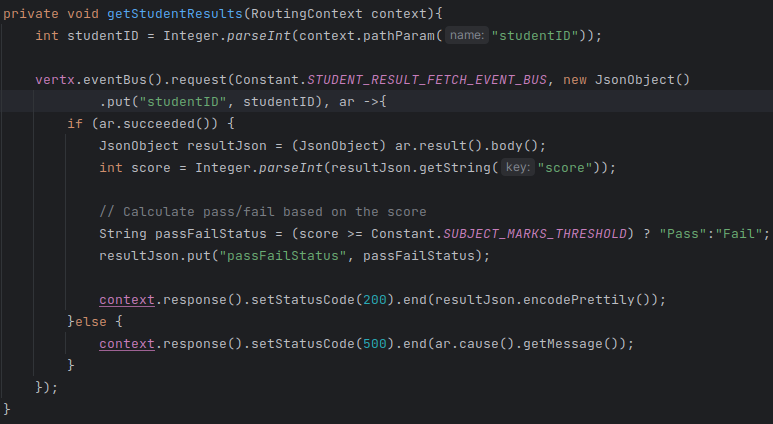
This line defines a route to handle HTTP GET requests with the path "/students/:studentID/results". It specifies the method getStudentResults to be executed when an HTTP GET request is received on this route. The ":studentID" part is a path parameter that can be extracted from the URL to identify the specific student for whom the results are requested.
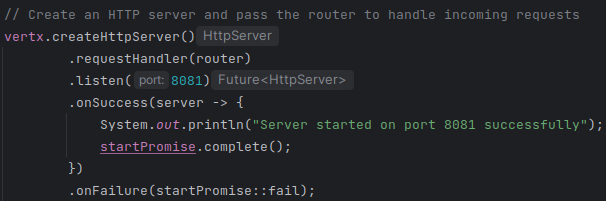
This code block creates an HTTP server using createHttpServer() and passes the router to handle incoming requests. It listens on port 8081 for incoming HTTP requests.
In the saveStudent and getStudentResults methods, the code sends data to the Vert.x event bus using vertx.eventBus().request(...). The event bus is a communication channel that allows different verticles in a Vert.x application to communicate with each other asynchronously. Here, the data (Student object or studentID) is sent to the event bus for processing in other verticles (e.g., DBVerticle).
In the saveStudent method, the code receives the result of the event bus request using a callback (ar -> {...}). If the event bus request is successful (ar.succeeded()), it returns a 200 status code and the response body is sent back to the client. If it fails (ar.cause()), it returns a 500 status code with an error message.
In the getStudentResults method, the code receives the result of the event bus request to fetch student results. If the event bus request is successful, it calculates the pass/fail status based on the score received from the event bus response and returns the result as a JSON object to the client.
DBVerticle class
DBVerticle is responsible for managing the database operations for saving student and result data. It uses the Vert.x event bus to receive messages containing student and result objects, and then asynchronously saves them to the MySQL database using the JDBC pool. The Promise and Future classes are used to handle the asynchronous nature of the database operations and provide a convenient way to handle the success or failure of the operations.
This class DBVerticle extends AbstractVerticle, which means it is a verticle that can be deployed and managed by Vert.x.
jdbcPool will be used to interact with the MySQL database, and log will be used for logging.
A JsonObject named config is created, containing the necessary configuration options for the MySQL database connection, such as URL, driver class, username, password, and max pool size.
The JDBCPool named jdbcPool is created using the configuration provided. This pool will be used to manage connections to the database.
A vert.x event bus consumer is registered to listen on the address Constant.STUDENT_SAVE_EVENT_BUS
This consumer will receive messages sent to this address.
When a message is received, it extracts the Student object from the message body.
The saveStudent method is called to save the student object to the database asynchronously. It returns a Future that represents the result of the database operation.
Depending on whether the operation succeeds or fails, appropriate callbacks are used to reply to the message with the result or failure message.
Another event bus consumer is registered to listen on the address Constant.STUDENT_RESULT_SAVE_EVENT_BUS
When a message is received, it extracts the Result object from the message body.
The saveResult method is called to save the result object to the database asynchronously. It returns a Future that represents the result of the database operation.
Depending on whether the operation succeeds or fails, appropriate callbacks are used to reply to the message with the result or failure message.
The saveStudent method is responsible for saving a Student object to the database.
A Promise named promise is created, which represents the result of the asynchronous operation.
A Tuple named tuple is created to hold the parameters of the SQL query for inserting the student into the database.
The jdbcPool executes the prepared query for inserting the student data into the database using the execute method.
Appropriate callbacks are used to complete the promise with the success message or fail the promise with the error.
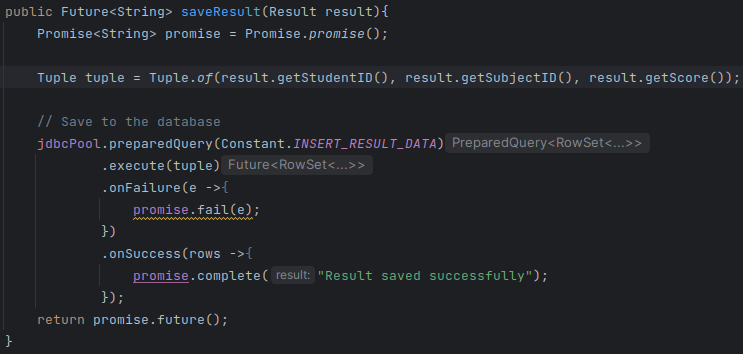
The saveResult method is responsible for saving a Result object to the database.
Similar to the saveStudent method, it creates a Promise and a Tuple to hold the parameters of the SQL query.
The jdbcPool executes the prepared query for inserting the result data into the database.
Appropriate callbacks are used to complete the promise with the success message or fail the promise with the error.
HttpClientVerticle class
HttpClientVerticle is responsible for fetching student results from a third-party API and saving them to the database. This verticle is responsible for fetching student results from a third-party API, processing the results, calculating the pass/fail status, and saving the updated results to the database using the Vert.x event bus for communication with other verticles.
The WebClient is a Vert.x class used to make HTTP requests to external services or APIs.
This line creates a new WebClient object using the create method and associates it with the current Vert.x instance (vertx). The WebClient is now ready to send HTTP requests.
This sets up an event bus consumer that listens for messages on the Constant.STUDENT_RESULT_FETCH_EVENT_BUS address. When a message is received on this address, the provided callback function will be executed to handle the message.
In the callback function, JsonObject bodyJson = (JsonObject) request.body();: This line extracts the JSON data from the event bus message body. The request parameter represents the event bus message received by the consumer. The message body is expected to be a JSON object with a "studentID" property.
int studentID = bodyJson.getInteger("studentID");: This line extracts the student ID from the JSON object received in the event bus message.
This line creates an HTTP GET request using WebClient to fetch student results from a third-party API. The URL used in the request is "https://api.mockfly.dev/mocks/015d217e-d0fe-4aa8-a578-04a03e46d7a6/result". Note that this is a hardcoded URL, and the studentID extracted from the event bus message is not used in this URL.
.send(): This line sends the HTTP GET request to the third-party API and returns a Future representing the result of the request.
The code then continues with handling the response of the HTTP GET request using .onSuccess(...) and .onFailure(...) callbacks. If the request is successful, it proceeds to process the received JSON response.
JsonObject resultJson = res.bodyAsJsonObject();: This line extracts the response body as a JsonObject from the HTTP response.
int score = Integer.parseInt(resultJson.getString("score"));: This line extracts the "score" property from the response JSON and converts it to an integer.
String passFailStatus = (score >= Constant.SUBJECT_MARKS_THRESHOLD) ? "Pass" : "Fail";: This line calculates the pass/fail status based on the score. It compares the score with the threshold defined in Constant.SUBJECT_MARKS_THRESHOLD.
resultJson.put("passFailStatus", passFailStatus);: This line adds the calculated pass/fail status to the JSON response.
resultJson.put("studentId", studentID);: This line adds the extracted student ID to the JSON response.
Result result = new Result(res.bodyAsJsonObject().put("studentId", studentID));: This line creates a Result object using the response JSON and the extracted student ID. It appears that the Result class constructor takes a JsonObject parameter and assigns it to the "studentId" property of the Result object.
vertx.eventBus().request(Constant.STUDENT_RESULT_SAVE_EVENT_BUS, result, ar -> {...});: This line sends the Result object to the event bus using vertx.eventBus().request(...). It also specifies a callback function to handle the response from the event bus. The message is sent to the Constant.STUDENT_RESULT_SAVE_EVENT_BUS address.
If the event bus request to save the result is successful (ar.succeeded()), the code replies to the original request with the updated JSON response containing the pass/fail status and student ID. If the event bus request fails, it returns a 500 status code with an error message.
Constant class
By using constants, the application can easily refer to these values across different parts of the code. For example, when sending a request to save a student's data or result to the event bus, the specified event bus addresses are used to ensure the messages reach the appropriate verticles for processing. Similarly, SQL queries are used to perform database operations consistently and efficiently.
package util;
public class Constant {
// Event bus address
public static final String STUDENT_SAVE_EVENT_BUS = "student.save";
public static final String STUDENT_RESULT_FETCH_EVENT_BUS = "get.student.result";
public static final String STUDENT_RESULT_SAVE_EVENT_BUS = "result.save";
// SQL query
public static final String INSERT_STUDENT_DATA = "INSERT INTO Student_details (Student_ID, Student_Name, Student_Age) VALUES (?, ?, ?)";
public static final String INSERT_RESULT_DATA = "INSERT INTO subject_results (Student_ID, Subject_ID, Marks) VALUES (?, ?, ?)";
//Other
public static final int SUBJECT_MARKS_THRESHOLD = 50; // Marks threshold for pass/fail
}
Created By: Malinda Gamage[https://www.linkedin.com/in/malinda-gamage-b43b83199/]

LocalEventBusCodec class

Vert.x runtime

HttpServerVerticle is responsible for handling HTTP requests and serving the HTTP server functionality.
DBVerticle is responsible for interacting with the database and handling database-related operations.
HttpClientVerticle is responsible for making HTTP client requests to external services or APIs.
AbstractVerticle class
Vert.x provides `AbstractVerticle` to simplify the implementation of custom verticles.
It allows you to handle the deployment, initialization, and cleanup of a verticle.
You can override the `start` and `stop` methods to define the behaviour when the verticle is deployed and undeployed, respectively.
The `start` method is executed when the verticle is deployed, and you can define the main logic or tasks that the verticle should perform here.
The `stop` method is executed when the verticle is undeployed, and you can perform any cleanup or resource release tasks here.
HttpServerVerticle class


DBVerticle class


HttpClientVerticle class


Constant class
Comments
Post a Comment